
How to Light an Oak Tree: Trunk, Canopy, Uplighting & Moonlighting
Chris Kelly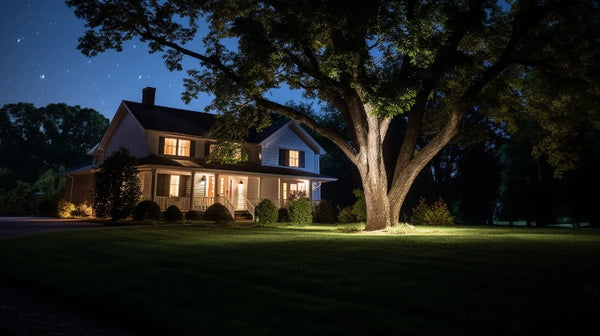
Oak trees give a landscape several different lighting targets at once: a textured trunk, spreading branches, a broad canopy, and an irregular silhouette. The best lighting plan starts by deciding which part of the tree you want people to notice after dark.
Some oaks look best with one controlled uplight on the trunk. Larger specimens may benefit from two or more viewpoints, while a mature canopy can support a broader uplighting or professionally installed moonlighting effect. The fixture count and placement should follow the individual tree rather than a rigid formula.
Start With the Lighting Goal
Before choosing a fixture or lamp, decide whether the priority is:
- Trunk texture: emphasize bark, lower limbs, and branching structure.
- Canopy: carry light farther into the crown so the tree reads as a larger nighttime feature.
- Full-tree form: balance trunk, major branches, and canopy.
- Silhouette: light a wall or surface behind the tree so the oak appears in shadow.
- Moonlighting: create controlled downward illumination from an elevated position.
Those effects need different fixture positions and beam choices even when the same MR16 spotlight family is used.
Oak Tree Uplighting: A Good Starting Technique
For many oak trees, ground-level uplighting is the simplest starting point. An adjustable spotlight can be aimed from the ground toward the trunk, main branching structure, or canopy.
Uplighting works well because the fixture can usually remain accessible for:
- nighttime aiming adjustments
- lamp replacement
- lens cleaning
- plant-growth changes
- future wire and connection service
Use the Landscape Spotlight Positioning Guide for the broader placement workflow.
Lighting the Trunk
To emphasize bark and lower branching, begin with the fixture relatively close to the trunk and aim upward through the section you want to reveal.
Closer placement generally creates:
- stronger texture
- more pronounced highlights and shadows
- a narrower illuminated section of the tree
Do not place the fixture so close that it creates an unpleasant hotspot or sends most of the beam past the target. Move the fixture and adjust the beam after dark until the bark texture is visible without making one small area disproportionately bright.
Lighting the Canopy
A broad mature oak canopy usually needs a different approach from a narrow trunk.
To carry light farther into the branches:
- increase fixture setback so the beam has room to open
- consider a wider beam angle
- aim into the branching structure rather than simply at the outside leaves
- use more than one fixture when one viewpoint leaves large portions of the canopy dark
Large trees are three-dimensional. One bright fixture at the front can flatten the appearance if every visible branch is illuminated from the same direction.
40° vs 60° MR16 for Oak Trees
Total Light's current MR16 lamp families include 40-degree and 60-degree beam options.
- 40°: more concentrated; useful for defined trunks, narrower branch structures, and greater fixture-to-target distances where a focused beam is useful.
- 60°: broader; useful for spreading canopies, larger branch areas, and softer coverage.
Beam angle is not independent of distance. A 40° beam grows wider as it travels, while a 60° lamp placed too close to the trunk can spill light far beyond the intended area.
Use the MR16 Landscape Lighting Guide for the full wattage, beam, and Kelvin comparison.
5W vs 7W MR16 for a Large Tree
Do not choose lamp wattage only from the fact that an oak is “large.” Consider:
- fixture distance
- beam angle
- target height
- surrounding ambient light
- bark and foliage reflectance
- how many fixtures share the job
A 7W lamp can provide more output than a 5W lamp in the same family, but two carefully placed lower-output fixtures may create more useful depth than one overly bright source.
Cross-Lighting a Mature Oak
Cross-lighting uses fixtures from different directions to reveal more of the tree's three-dimensional form.
This can work well when:
- the trunk has interesting branching visible from several sides
- one fixture leaves the back or side of the tree visually flat
- the tree is a major focal point viewed from multiple areas of the property
The fixtures do not have to be perfectly symmetrical. Place them around the useful viewing angles and tune each beam independently.
Avoid Lighting Every Side Equally
Uniform brightness can make a tree look flatter than a design with intentional contrast.
Allow some branches and foliage to fall into shadow. A brighter side, softer secondary side, and unlit portions of the canopy can reveal more depth than flooding the entire tree evenly.
See Landscape Lighting With Light and Shadow for contrast and layering techniques.
Silhouetting an Oak Tree
If an oak stands in front of a wall, fence, or other broad surface, consider lighting the background rather than the tree itself.
When the background is illuminated and the tree remains relatively dark, the trunk and branch pattern can appear as a silhouette.
This technique works best when:
- there is enough separation between the tree and background
- the wall or surface can be illuminated evenly
- the silhouette is visible from an important viewing position
Use the Wall Washing vs Wall Grazing Guide when planning the background illumination.
Downlighting and Moonlighting an Oak
Downlighting places a fixture above the target and aims light downward. Moonlighting is a particular downlighting effect designed to create a softer, more natural pattern through branches and foliage.
These techniques can be attractive on a mature oak, but they create a different installation problem from ground-level uplighting. Elevated fixtures must be mounted securely, wired appropriately, kept serviceable, and installed without creating unnecessary harm to the tree or unsafe access conditions.
Tree-mounted or other elevated installation should not be treated as a casual “climb up and attach a light” project. Where specialized access, tree-health evaluation, or elevated electrical work is involved, use qualified lighting and tree-care professionals as appropriate.
Use Downlighting vs Moonlighting for the design distinction and Uplighting vs Downlighting when comparing the two overall approaches.
2700K vs 3000K on Oak Bark and Foliage
Both 2700K and 3000K are warm-white choices.
- 2700K: warmer and slightly more golden; often works naturally with brown bark, warm stone, and traditional residential materials.
- 3000K: slightly cleaner and more neutral; can create a crisper appearance on pale bark, masonry, or modern architecture near the tree.
Kelvin is a color choice, not a brightness control. Test the lamp against the actual bark and foliage when possible.
See 2700K vs 3000K Landscape Lighting.
How Far Should the Fixture Be From the Oak?
There is no single setback that works for every oak tree.
Choose fixture distance from:
- tree diameter and canopy width
- which part of the tree you want to emphasize
- beam angle
- fixture output
- available planting-bed space
- roots and irrigation
- normal viewing positions
Move the fixture closer for stronger bark texture and a steeper aiming angle. Move it farther away when you need the beam to open across more of the tree.
Do Not Damage Major Roots Just to Reach a Preferred Fixture Position
Tree roots and the surrounding soil are part of the site conditions. If the ideal-looking fixture location would require unnecessary excavation around major roots, move the fixture, adjust the beam, or choose a different mounting strategy.
Contact 811 before digging where required and account for private irrigation and existing low-voltage systems as well.
Use the Landscape Lighting Without Damaging Your Lawn guide for route-planning principles.
Keep the Fixture Out of Routine Landscape Traffic
A ground-mounted oak-tree uplight should remain accessible without sitting directly in:
- mower paths
- frequent foot traffic
- edging lines
- areas where landscape crews routinely place equipment
If a fixture repeatedly gets moved or damaged, evaluate the placement or mounting method instead of simply installing a larger lamp or tightening the stake.
Control Glare From Important Viewing Positions
A beautifully lit oak can still be uncomfortable if the lamp is visible from a patio, window, walkway, or street.
After dark, view the tree from:
- the house
- primary outdoor seating
- the driveway
- the street
- nearby paths
Reposition, re-aim, reduce output, or use a fixture with better shroud control if direct lamp visibility becomes the dominant part of the scene.
Use Multiple Fixtures for a Reason
There is no universal “large oak = three fixtures” rule.
Add another fixture only when it solves a specific design problem, such as:
- one side of the branching structure disappears
- the canopy is too broad for one useful beam
- the tree is viewed from several directions
- cross-lighting would add useful depth
More fixtures can also create more glare, overlap, transformer load, wire runs, and service points. Use only what improves the finished effect.
Plan the Electrical System Around the Final Fixture Count
Once the design is established, calculate the total connected lamp wattage and plan the wire runs.
Consider:
- transformer capacity
- wire gauge
- one-way run length
- voltage drop
- connection locations
- future service access
Use How to Plan a Low-Voltage Landscape Lighting System and the Wire Gauge Guide for those calculations.
Test the Oak After Dark
Nighttime testing is essential because daylight does not show:
- hot spots on the bark
- dark areas in the canopy
- glare from normal viewing positions
- unwanted light beyond the crown
- whether multiple fixtures create depth or simply duplicate one another
Make one change at a time—distance, aim, beam, or output—so you can see what actually improves the design.
Oak Tree Lighting Checklist
- Choose trunk, canopy, full-tree, silhouette, or moonlighting as the main effect.
- Choose fixture positions from the tree's real geometry.
- Select 40° or 60° beam angle from target width and distance.
- Select lamp output without defaulting to the highest wattage.
- Use multiple fixtures only when they add depth or necessary coverage.
- Keep fixtures away from routine traffic and major-root excavation where practical.
- Control glare from windows, patios, walks, and streets.
- Plan transformer capacity, wire gauge, and connection locations.
- Use qualified professionals for elevated/tree-mounted work when appropriate.
- Test the finished design after dark.
Frequently Asked Questions
What is the best way to light an oak tree?
There is no one best method. Uplighting is a practical starting technique, while cross-lighting, silhouetting, and professionally installed moonlighting can work when the tree and site support those effects.
Should I aim the spotlight at the trunk or canopy?
Choose based on what you want to emphasize. Closer and more focused aiming can reveal trunk texture, while greater setback and broader beam coverage can carry more light into the canopy.
Should I use a 40° or 60° MR16?
A 40° beam is more concentrated and a 60° beam is broader. Match the beam to the tree width and fixture distance, then confirm the result after dark.
How many uplights does a large oak need?
There is no universal fixture count. Add fixtures only when the size, viewing angles, or branching structure require additional coverage or depth.
Is 2700K or 3000K better for oak trees?
Both can work. 2700K looks warmer and more golden, while 3000K is slightly cleaner and more neutral. Choose the color that complements the bark, foliage, architecture, and surrounding lighting.
Can I mount a downlight in the oak tree?
Elevated tree-mounted lighting can create attractive moonlighting, but mounting, wiring, access, service, and tree-health considerations require more care than ground-level uplighting. Use qualified lighting/tree-care professionals where the installation calls for specialized work.
Let the Oak’s Structure Decide the Lighting
A mature oak already has visual depth in its trunk, branching, and canopy. The lighting should reveal that structure rather than flatten it with uniform brightness. Start with the part of the tree you want to feature, choose the beam and fixture positions around that goal, and make the final decisions after dark.
Browse Total Light uplights and spotlights, compare MR16 LED lamps, or use the spotlight-positioning guide for the broader tree-lighting workflow.